Thực hành SQLite với Sugar ORM
Khóa học lập trình Android cơ bản
Danh sách bài học
Thực hành SQLite với Sugar ORM
Dẫn nhập
Ở các bài học trước, chúng ta đã cùng nhau tìm hiểu vềTHỰC HÀNH SQLITE QUA VÍ DỤ. Bài trước nữa thì là LÝ THUYẾT LƯU TRỮ DỮ LIỆU VỚI SQLITE, và tác dụng của nó khi áp dụng vào ứng dụng Android.
Đã trót là phải trét, chúng ta quẩy nốt bài cuối cùng về SQLite nhé. Bài này chúng ta sẽ làm việc với SugarORM, một thư viện ORM (Object Relational Maping) khá ngon của Android. Có tác dụng ánh xạ đối tượng Java với bảng SQLite qua các API rất dễ hiểu.
Nội dung
Để đọc hiểu bài này tốt nhất các bạn nên có kiến thức cơ bản về các phần:
- CẤU TRÚC CƠ BẢN CỦA MỘT CHƯƠNG TRÌNH ANDROID.
- Biết cách chỉnh sửa file AndroidManifest.xml, thêm dependency vào ứng dụng Android.
- Nắm được cơ bản LƯU TRỮ DỮ LIỆU VỚI SQLITE.
Trong bài học này, chúng ta sẽ cùng tìm hiểu các vấn đề:
- Cách nhập thư viện SugarORM vào ứng dụng Android.
- Làm một ứng dụng đơn giản sửa xoá các trường, mà chỉ dùng code Java.
Cài đặt SugarORM
SugarORM không có dependency nào khác, tức là chỉ cần download file jar chứa thư viện là đủ, hoặc cách dễ nhất là thêm dependency vào file app/build.gradle. Kiểu kiểu như sau:
apply plugin: 'com.android.application'

android {
    compileSdkVersion 25
    buildToolsVersion "25.0.0"
    defaultConfig {
        applicationId "com.howkteam.sugarormex"
        minSdkVersion 13
        targetSdkVersion 25
        versionCode 1
        versionName "1.0"
        testInstrumentationRunner "android.support.test.runner.AndroidJUnitRunner"
    }
    buildTypes {
        release {
            minifyEnabled false
            proguardFiles getDefaultProguardFile('proguard-android.txt'), 'proguard-rules.pro'
        }
    }
}

dependencies {
    compile fileTree(dir: 'libs', include: ['*.jar'])
    androidTestCompile('com.android.support.test.espresso:espresso-core:2.2.2', {
        exclude group: 'com.android.support', module: 'support-annotations'
    })
    compile 'com.android.support:appcompat-v7:25.0.0'
    compile 'com.github.satyan:sugar:1.5'
    testCompile 'junit:junit:4.12'
}
Trong đoạn trên chú ý dòng này nhé:
compile 'com.github.satyan:sugar:1.5'
- Phiên bản hiện thời là 1.5, và đang hoạt động khá là ổn. Tiếp theo, chúng ta sửa file AndroidManifest.xml thành như sau:
<?xml version="1.0" encoding="utf-8"?>
<manifest xmlns:android="http://schemas.android.com/apk/res/android"
          package="com.howkteam.sugarormex">

    <application
        android:name="com.orm.SugarApp"
        android:allowBackup="true"
        android:icon="@mipmap/ic_launcher"
        android:label="@string/app_name"
        android:supportsRtl="true"
        android:theme="@style/AppTheme">
        <meta-data android:name="DATABASE" android:value="howkteam.db" />
        <meta-data android:name="VERSION" android:value="2" />
        <meta-data android:name="QUERY_LOG" android:value="true" />
        <meta-data android:name="DOMAIN_PACKAGE_NAME" android:value="com.howkteam" />
        <activity android:name=".MainActivity">
            <intent-filter>
                <action android:name="android.intent.action.MAIN"/>

                <category android:name="android.intent.category.LAUNCHER"/>
            </intent-filter>
        </activity>
    </application>

</manifest>
Chú ý những dòng sau là những dòng thêm vào:
android:name="com.orm.SugarApp"
<meta-data android:name="DATABASE" android:value="howkteam.db" />
        <meta-data android:name="VERSION" android:value="2" />
        <meta-data android:name="QUERY_LOG" android:value="true" />
        <meta-data android:name="DOMAIN_PACKAGE_NAME" android:value="com.howkteam" />
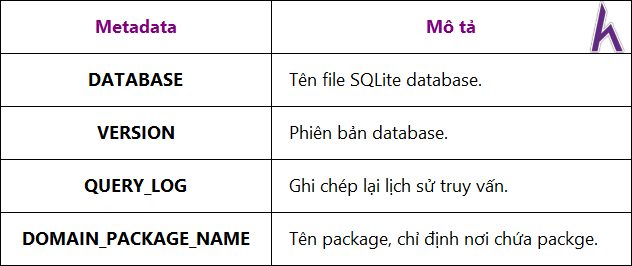
Chúng là những thông tin cần thiết để cấu thành database SQLite. Cụ thể là:

Sử dụng SugarORM
Để tạo các model trong bảng, chúng ta chỉ cần cho nó extend từ lớp SugarRecord <Tên_Model> , quá dễ dàng và đơn giản!
Tuy nhiên cần lưu ý:
Phải luôn có default constructor (constructor mặc định, không có tham số truyền vào, và không phải private).
Ở SugarORM bản 1.2 cũ, bạn phải thêm 1 constructor có tham số đầu vào là một Context.
Và thế là xong, SugarORM sẽ tự tạo bảng cho bạn dựa trên Model đã tạo. SugarORM cũng rất thông minh, nếu như tên trường bạn đặt là fullName thì khi tạo cột, nó sẽ tạo ra cột với tên là full_name (rất quan trọng khi truy vấn).
- Tạo liên kết giữa các model cũng khá là dễ dàng. Ví dụ ta cần cho một cột mới có tên là “Tool”:
package com.howkteam.sugarormex;


import com.orm.SugarRecord;

public class Tool extends SugarRecord {
  public String name;
}
- Vào bảng Person:
package com.howkteam.sugarormex;

import com.orm.SugarRecord;

public class Person extends SugarRecord {

  // Luôn phải để một constructor trống.
  public Person() {
  }

  // Constructor mà chúng ta sẽ dùng để tạo đối tượng.
  public Person(String name, int age) {
    this.name = name;
    this.age = age;
  }

  // 2 thuộc tính cơ bản.
  public String name;
  public int age;
  public Tool tool;
}
- Để lấy danh sách các trường trong bảng, lấy tất cả, chỉ cần:
List<Person> people;
people = Person.listAll(Person.class);
- Để thêm một bản ghi mới:
Person p = new Person("A " + String.valueOf(count), count);
// Lưu record mới vào DB.
p.save();
- Để xoá tất cả các bản ghi:
Person.deleteAll(Person.class);
- Xoá một bản ghi ở vị trí đầu tiên trong bảng:
Person p = Person.findById(Person.class, 1);

p.delete();
- Hoặc lấy bản ghi đầu tiên ra thôi:
Person p = Person.findById(Person.class, 1);
Quá đơn giản phải không nào? Và để làm lại ứng dụng buổi trước bằng Sugar ORM, chúng ta chỉ cần làm theo các bước đơn giản sau:
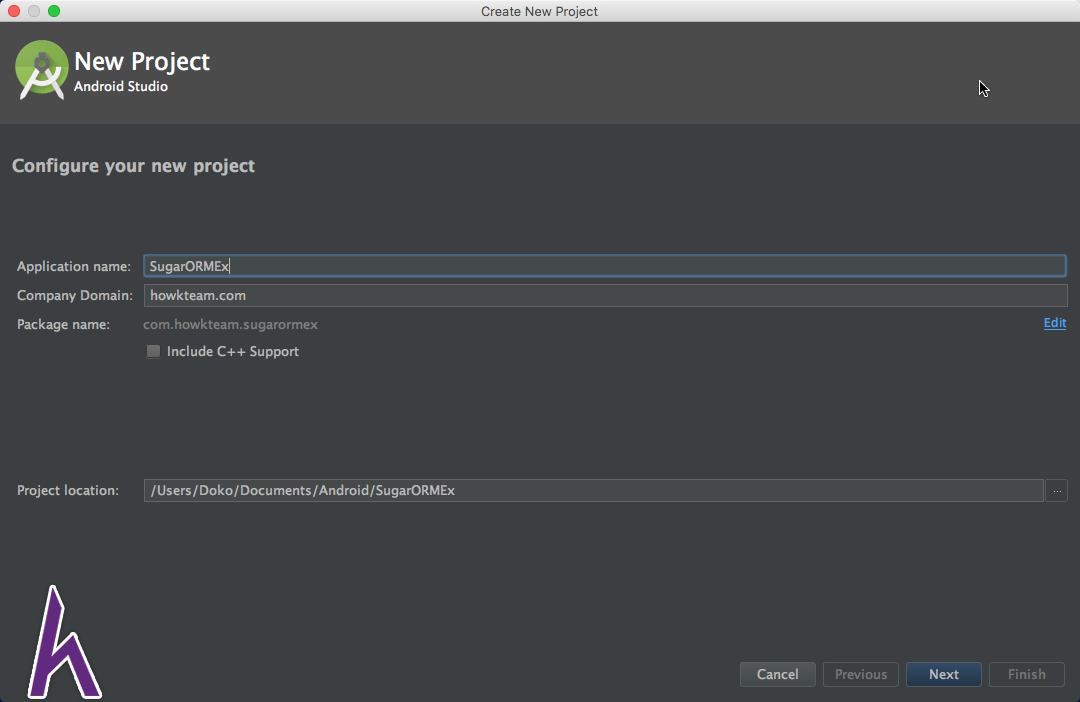
Bước 1: Tạo project, lần này chúng ta sẽ lấy tên là SugarORMEx:

Bước 2: Thêm dependency SugarORM vào file build.gradle
apply plugin: 'com.android.application'

android {
    compileSdkVersion 25
    buildToolsVersion "25.0.0"
    defaultConfig {
        applicationId "com.howkteam.sugarormex"
        minSdkVersion 13
        targetSdkVersion 25
        versionCode 1
        versionName "1.0"
        testInstrumentationRunner "android.support.test.runner.AndroidJUnitRunner"
    }
    buildTypes {
        release {
            minifyEnabled false
            proguardFiles getDefaultProguardFile('proguard-android.txt'), 'proguard-rules.pro'
        }
    }
}

dependencies {
    compile fileTree(dir: 'libs', include: ['*.jar'])
    androidTestCompile('com.android.support.test.espresso:espresso-core:2.2.2', {
        exclude group: 'com.android.support', module: 'support-annotations'
    })
    compile 'com.android.support:appcompat-v7:25.0.0'
    compile 'com.github.satyan:sugar:1.5'
    testCompile 'junit:junit:4.12'
}
Bước 3: Tạo class model, ở đây chúng ta sẽ lấy là “Person”:
package com.howkteam.sugarormex;

import com.orm.SugarRecord;

public class Person extends SugarRecord {

  // Luôn phải để một constructor trống.
  public Person() {
  }

  // Constructor mà chúng ta sẽ dùng để tạo đối tượng.
  public Person(String name, int age) {
    this.name = name;
    this.age = age;
  }

  // 2 thuộc tính cơ bản.
  public String name;
  public int age;
}
Bước 4: Bước này cực kỳ quan trọng: Chỉnh sửa file AndroidManifest như sau:
<?xml version="1.0" encoding="utf-8"?>
<manifest xmlns:android="http://schemas.android.com/apk/res/android"
          package="com.howkteam.sugarormex">

    <application
        android:name="com.orm.SugarApp"
        android:allowBackup="true"
        android:icon="@mipmap/ic_launcher"
        android:label="@string/app_name"
        android:supportsRtl="true"
        android:theme="@style/AppTheme">
        <meta-data android:name="DATABASE" android:value="howkteam.db" />
        <meta-data android:name="VERSION" android:value="4" />
        <meta-data android:name="QUERY_LOG" android:value="true" />
        <meta-data android:name="DOMAIN_PACKAGE_NAME" android:value="com.howkteam" />
        <activity android:name=".MainActivity">
            <intent-filter>
                <action android:name="android.intent.action.MAIN"/>

                <category android:name="android.intent.category.LAUNCHER"/>
            </intent-filter>
        </activity>
    </application>

</manifest>
Nên nhớ kỹ: Phần VERSION luôn phải đặt trên 1, và mỗi khi có model mới, bạn phải nâng số này lên.
Bước 5: Đổi lại nội dung file activity_main.xml:
<?xml version="1.0" encoding="utf-8"?>
<LinearLayout xmlns:android="http://schemas.android.com/apk/res/android"
              android:layout_width="match_parent"
              android:layout_height="match_parent"
              android:orientation="vertical">

    <LinearLayout
        android:id="@+id/group"
        android:layout_width="wrap_content"
        android:layout_height="wrap_content">

        <Button
            android:id="@+id/add"
            android:layout_width="wrap_content"
            android:layout_height="wrap_content"
            android:onClick="onClick"
            android:text="Add New"/>

        <Button
            android:id="@+id/delete_all"
            android:layout_width="wrap_content"
            android:layout_height="wrap_content"
            android:onClick="onClick"
            android:text="Delete All"/>

    </LinearLayout>

    <ListView
        android:id="@android:id/list"
        android:layout_width="match_parent"
        android:layout_height="wrap_content"
        />

</LinearLayout>
Và cuối cùng là chỉnh sửa file MainActivity.java, các đoạn code có giải thích như comment:
package com.howkteam.sugarormex;

import android.app.ListActivity;
import android.os.Bundle;
import android.view.View;
import android.widget.ArrayAdapter;

import java.util.List;

// Cho activity này extend từ ListActivity.
// Lưu ý là các bản ghi trong database bắt đầu từ 1, không phải từ 0.
public class MainActivity extends ListActivity implements View.OnClickListener {

  int count = 0;
  ArrayAdapter<Person> adapter;
  List<Person> people;

  @Override
  protected void onCreate(Bundle savedInstanceState) {
    super.onCreate(savedInstanceState);
    setContentView(R.layout.activity_main);

    // Lấy hết danh sách people, nhét vào List tương ứng.
    people = Person.listAll(Person.class);

    adapter = new ArrayAdapter<>(this,
            android.R.layout.simple_list_item_1, people);
    setListAdapter(adapter);
  }

  @Override
  public void onClick(View view) {
    if (view.getId() == R.id.delete_all) {
      // Xoá tất cả các phần tử trong bảng Person.
      Person.deleteAll(Person.class);
      // Và xoá luôn trong danh sách.
      people.clear();
      refresh();
    }

    if (view.getId() == R.id.add) {
      count++;
      Person p = new Person("A " + String.valueOf(count), count);
      // Lưu record mới vào DB.
      p.save();
      // Thêm vào danh sách để hiển thị màn hình.
      people.add(p);
      refresh();
    }
  }

  // Thông báo cho adapter rằng danh sách các phần tử đã thay đổi.
  private void refresh() {
    adapter.notifyDataSetChanged();
  }
}
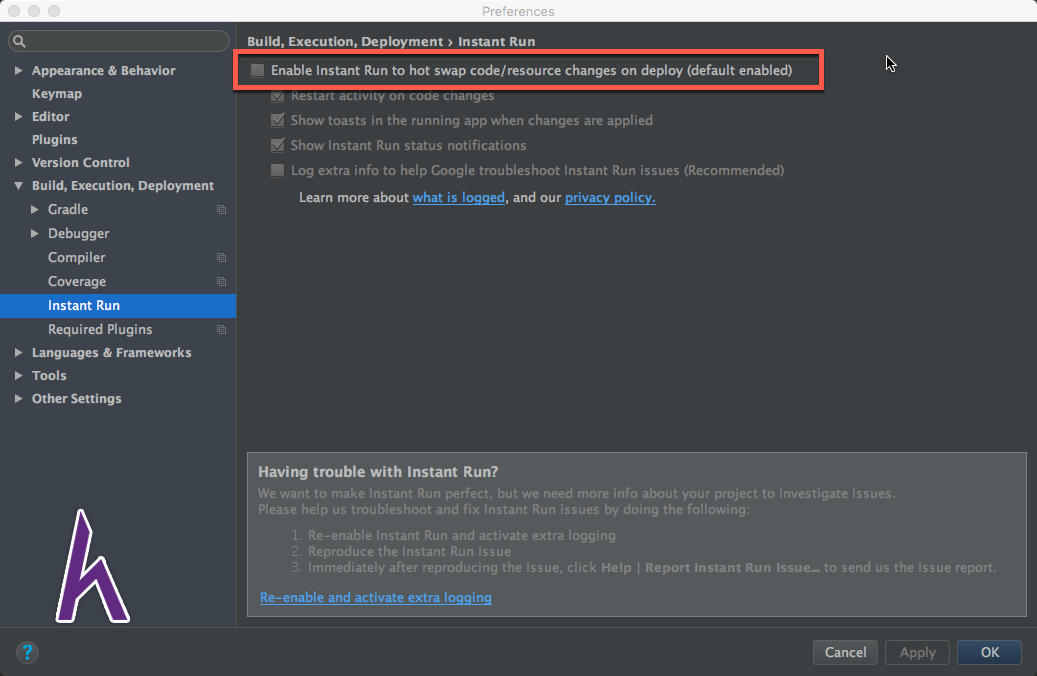
Trước khi chạy, các bạn nên tắt Instant Run của Android Studio. Vào File > Settings (hoặc Preferences). Trên Mac thì là Android Studio > Preferences:

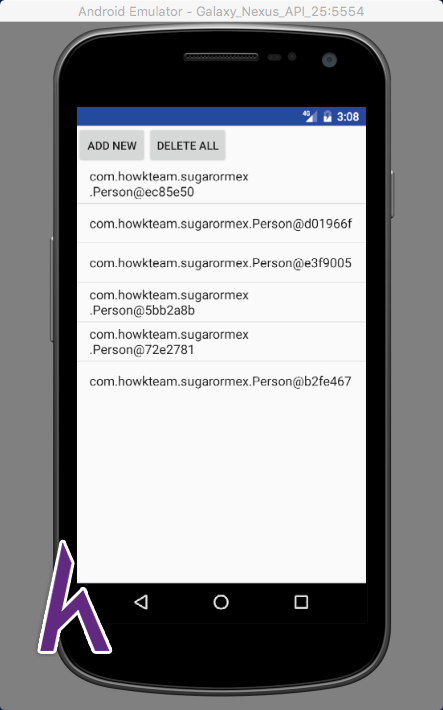
Chạy, ở đây danh sách hiển thị là object và mã hash của object nên nhìn hơi ngố ngố tẹo, các bạn hoàn toàn có thể sửa bằng cách tạo adapter riêng:

Vậy là bạn đã tiết kiệm được:
- Thời gian tạo SQLiteDBHelper.
- Thời gian tạo class DataSource.
Đồng thời là code ngắn hơn, dễ hiểu hơn rất nhiều. Ngoài SugarORM, còn rất nhiều thư viện khác như:
- Requery
- ORMLite
- DBFlow
- Squidb
- GreenDAO
- ActiveAndroid
- Cupboard
Kết luận
Qua bài này chúng ta đã nắm được ORM là gì, tác dụng của nó với SQLite ra sao, và viết một ứng dụng đơn giản sử dụng Sugar ORM.
Bài sau chúng ta sẽ tìm hiểu về CÁCH TÍCH HỢP FACEBOOK VÀO ỨNG DỤNG - Phần 1.
Cảm ơn các bạn đã theo dõi bài viết. Hãy để lại bình luận hoặc góp ý của mình để phát triển bài viết tốt hơn. Đừng quên “Luyện tập – Thử thách – Không ngại khó”.
Tải xuống
Tài liệu
Nhằm phục vụ mục đích học tập Offline của cộng đồng, Kteam hỗ trợ tính năng lưu trữ nội dung bài học Thực hành SQLite với Sugar ORM dưới dạng file PDF trong link bên dưới.
Ngoài ra, bạn cũng có thể tìm thấy các tài liệu được đóng góp từ cộng đồng ở mục TÀI LIỆU trên thư viện Howkteam.com
Đừng quên like và share để ủng hộ Kteam và tác giả nhé!

Thảo luận
Nếu bạn có bất kỳ khó khăn hay thắc mắc gì về khóa học, đừng ngần ngại đặt câu hỏi trong phần bên dưới hoặc trong mục HỎI & ĐÁP trên thư viện Howkteam.com để nhận được sự hỗ trợ từ cộng đồng.
Nội dung bài viết
Tác giả/Dịch giả
Khóa học
Khóa học lập trình Android cơ bản
Serial tutorial hướng dẫn lập trình Android cơ bản


